This is also the day when my kiddos come home from school completely and utterly sugared-up! Almost as buzzed at Halloween ... but not quite. I love that our teachers included in their letter home to parents the fact that they would also like to offer some non-sugar options: meat, cheese and crackers; and veggies and dip. I wish them the very best in getting the kids to choose carrots and ranch dip over cookies with frosting! :)
In addition to the sugar-coma in a bag that the kids enjoy in their classrooms, they also get the joy of exchanging heart-felt valentines. This year, my kids stood for about 10 minutes in front of the wall of valentine cards and debated and hemmed & hawed and discussed and studied every box on the shelf. Every. Box. At one point, Norah had Justin Bieber, Tinkerbell and Exotic Animals in her arms. She decided upon the animals ... whew! Aaron bounced back and forth between the Transformers box and the Spiderman Box ... and eventually walked away with a football themed set. Ashley flitted from girly-girl box to sparkly box and finally chose the Tinkerbell box ... only to go running back as soon as we left the aisle for the Disney Princess set. Such difficult choices!
This weekend, we had the job of designing the kid's boxes for the accumulation of similar valentines, packaged candies, tattoos, pencils and stickers that will be distributed this afternoon. I remember vividly designing my Valentine's Day box in elementary school. Cereal boxes covered in pink, red and white construction paper with paper, lace doilies, hearts and those little accordion folded paper arms that would sproing! out with little hearts glued on the ends! With this fond memory tucked away in my mind, we started talking about what sort of box they kids wanted to do. To my surprise ... they wanted to go a whole different route!
So ... I put away my red construction paper. I stored my pink markers. I didn't bother to buy doilies ... and pulled out the black satin fabric instead!
Here are my kids Valentine's Day boxes ... (drum roll, please .........)
 |
| Harry Potter and his broomstick! |
 |
| Puss-n-Boots and his "pretty please" eyes! |
Who knew that Harry and Puss could be iconic Valentine's Day characters?!?
I know that you are already done with Valentine's day for this year ... but if you want to tuck the following tutorial away for next time around, you'll have all you need to make your very own!
1. I rustled through the recycling bin to salvage several cereal boxes and plugged in my glue gun.
 |
| Rescued for a second life as a .... box. |
2. I turned the box "inside-out" by sliding my finger along the glued seam. I folded it back together with the print facing in. This will save you from trying to cover "100% Natural Cereal" with your white paper.
 |
| Inside out ... |
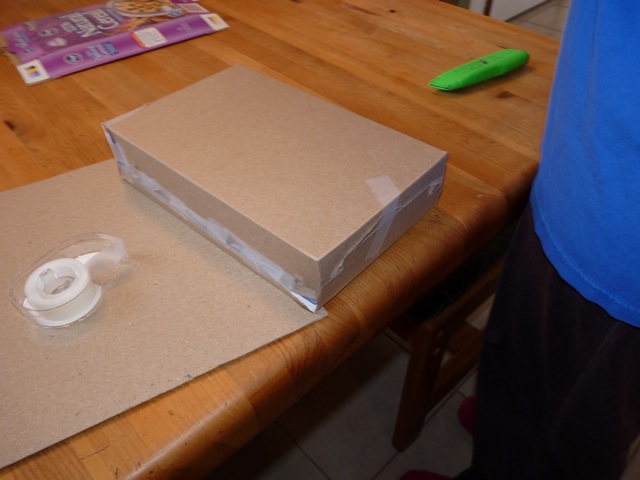 |
| and rebuilt. |
3. I cut the opening in the side of the box with an exacto blade. Norah wanted everyone to put their cards in the little paper sack, so her box is intact - purely the backdrop for the bag.
4. I have a roll of newspaper print stashed in the pantry for just such projects. I cut out pieces big enough to wrap around the boxes and then wrapped them just like a gift box.


4b. From here, Ashley decorated her box with stencils of butterflies, bumblebees, her name and "D E F". "D E F", you ask? Well ... when you are using an alphabet stencil, those letters sit side by side and fit perfectly on your box! Ha!
 |
| Proud Ashley and her butterfly box. |
5. I gently cut through the paper in the opening I had made previously and folded the little edges back against the slot in the box. I used a little tape to affix the edges so that they won't rip (too badly) when kids put/cram their cards in. For Aaron's box, I cut a little trap door in the back so that he can get his cards back out. I cut a flap on three sides and then held it closed with a little piece of tape. It is covered with the cape, so you don't even know that it's there.
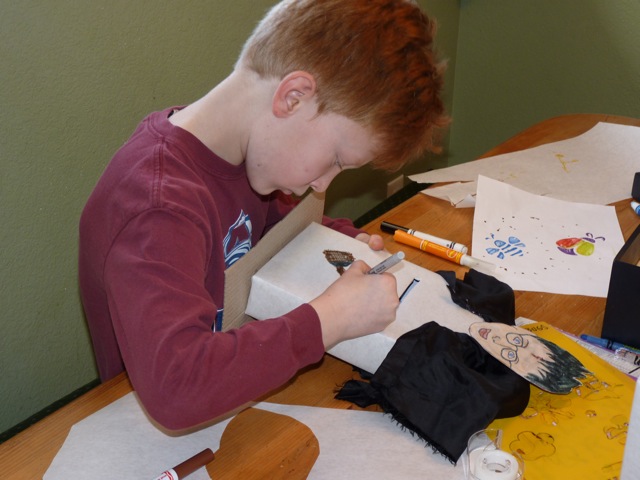
6. For the faces, I got on the internet and did a search for each character. When I found the ones I wanted to use, I copied the image to a Pages document and then enlarged it to the right size. Then I taped a piece of white paper to the computers screen and traced the outline of the face. The kids then went back in (with a little help from mom) and blacked-in the outlines and colored the faces with markers and crayons. Norah certainly had the most trouble with this because she had an image in her mind of what Puss-n-Boots should look like and he wasn't coming very close to what she imagined. But ... more on that later this week. (That's a whole post on its own!)
 |
| Harry is coming to life. |
 |
| Puss is getting some color. |
8. The cape material was left-over from when Aaron was a ninja for Halloween a few years ago. I simply cut out a rectangle of the satiny fabric and hot glue gunned on the cape around the "neck" of the character.
8a. At this point, Aaron/Harry was almost done. Aaron added the drawing of the Firebolt broomstick while I worked on his wand. We had a twig to which we glued a scrap of paper that had been colored to look like fire or sparks. I then glued the "wand" to the side of the box under the cape. I'm keeping my fingers crossed that this is still attached by the time the actual party rolls around tomorrow.
9. Norah had one more important part of her box to add and that was Puss' sack. I used a brown lunch sack and cut about 3 inches off the top. I also cut about 18 inches of red ribbon and glued this to the back of the sack about 1 inch from the top. I crinkled up the bag and then glued it flat to the front of the box, making sure that the ribbon was secure between the bag and box. I tied a little bow around the bag, but kept it loose enough that cards can easily be dropped in and retrieved. I hope. Or so Norah assured me.
9a. Meanwhile, Norah was drawing, coloring and cutting out his sword which slid very nicely into his paws that are clutching the top of his sack. Ta-dah!
 |
| Puss and Norah ... please give me some candy! :) |
All in all, it was a fun project (minus the not-fun that I will share tomorrow) and the kids were thrilled with their boxes. Mommy enjoyed it because it was crafty and creative with a little problem-solving thrown in for fun! All in a morning's work!
Happy Valentine's Day!
 |
| Personalize a photo slideshow |
Great recycling project! My oldest is only 3 so next year we will be doing this. I wanted to do some crafts with him but our foster baby is in the hospital. It has been miserable for us.
ReplyDeleteIt has never once crossed my mind to turn a cereal box inside out! What a clever idea, and it worked perfectly for your project!
ReplyDelete