Hey there ... are you candied out yet? I don't know about you, but it was a bit shocking to see the load that my kids came home with on Halloween. Eeek! And having just visited the dentist last week to get my cavities filled, I'm not too keen on the prospect of us consuming too much of this sugary goodness.
True Halloween Horror!
Fortunately, we have another option ... other than throwing it away! :)
If you live in the Grand Junction area, there is a Dental group in town that is buying candy back at $2 a pound. The candy received is donated to "Blue Star Mothers" who then use it as packing materials for care packages they send over-seas to our troops. How awesome is that?
Check out the specifics on this dentist's program here.
Nothing like cold, hard cash to help kids let go of their loot! :)
If you aren't from GJ ... you might check your local paper to see if any other dentists are doing something similar.
We'll be dropping of our stash on Tuesday ... and then probably heading to Target before their cash burns a hole in their pockets! :)
Well ... we survived yet another Halloween! And while my work is done, I do feel for the teachers today who got the really scary job trying to teach a class full of sugar-coma-ed, sleep-deprived, running-on-fumes students! Sorry!
Our Halloween weekend began on Saturday morning, actually. We decided to carve our pumpkins after breakfast, mainly because we weren't sure of when else exactly we would have time, and now I have decided that mornings are the perfect time to take on such a task. Sure, it's a little different carving pumpkins by the morning light. And sure, we had to remind ourselves to take pictures that night of them all aglow. But it was wonderful tackling this job when Daddy & Mommy were fresh ... and when the kids were in good moods, too. There is nothing that takes the fun out of a tradition like Mom losing her temper (with a knife, no less ... ha! ha!) because the kids have lost interest; or kids changing their minds about their design 15 times because they are tired and can't think straight. Also ... who wants to clean up pumpkin guts off the floor at 9:30 at night? Not me! So ... this year, we did it a little different ... and found that it was much more fun!
We started by taking a few pictures of our kids in the pumpkin patch (i.e. the living room ... we'd brought them in the night before so we wouldn't have to scoop out frozen guts!). These are three pumpkins that we grew in our very own garden this year. The pumpkin plant was called "Big Max" ... just so you know. That way you can either choose to grow 100 pound pumpkins ... or avoid that! :)
Yes ... Aaron has blue hair. No need to adjust your monitor. :)
The kids and Big Bertha ... No foolin' - she was a big 'un!
Then it was time to talk designs. Aaron was pretty set from the beginning: a football helmet. We got on the internet and printed off two team logos for the sides: the "C" from the Chicago Bears and the bull from the Texas Longhorns. Ashley was unsure, but quickly decided that a cheerleader pumpkin made perfect sense ... seeing as she would later be dressed as a cheerleader. A trip back to the computer yielded us a silhouette of a cheerleader to trace ... perfect! Then it was Norah turn. She and Lydia were sharing the third pumpkin, but in spite of Norah's efforts to involve Lydia in the decision-making process ... she was pretty much on her own. After a few sketches, she decided on a bunny pumpkin, complete with standy-up ears. Okay....
Due to the sheer size of the pumpkins, Brett and I were giving ourselves extra time for the cleaning process. That and the fact that Aaron's weak stomach prevents him from participating in said cleaning ... unless we want a different mess on the floor. In light of his squeamish tendencies, he was delegated to camera-man. Luckily, we have two and a half girls who didn't mind!
Ashley arm-deep in Aaron's pumpkin helmet.
Norah scraping and cleaning.
We cut into the tops of the pumpkins of Ashley's and Norah's but for Aaron's we laid it on it's side and cut the bottom ... it looked more like a helmet that way. To our surprise and delight, the pumpkins, while massive on the outside, were minimal in the muck department on the inside. Of course, there was still plenty of guts to scrape out, but we were done in just about a half-hour! Whew!
Lydia playing the spoons ... very loudly. We nipped this "help" quickly!
Next I traced out designs on Ashley's and Aaron's pumpkins ... Norah was contemplating some re-designing. By using a pencil, I was able to mark a thin line around my stencil ... easy enough to follow with a knife and easy enough to ignore when I made a mistake. Ashley's pattern was pretty straight forward so Daddy tackled that one. Aaron's still needed some creative interpretation, so I worked on his. Our favorite carving tool is my Pampered Chef paring knife, but since we only have one, we had to use our sharing skills and go back and forth. :) We were all pretty proud of our pumpkin creations ... none for than the kids. Whew! Two satisfied customers!
Da Bears!
Hook 'em Horns!
Eventually, it was time to work on Norah's pumpkin. Now, remember what I said about being fresh and in good moods ... that was starting to wane by this point. We were about 90-minutes into this project and while I had the end in sight, my most challenging design (and designer) was next. My Norah is a particular child and while she had a very specific design in her head, she was having trouble transferring that idea to paper. And in spite of any rumors ... I do not read minds and so we were in a pickle. We traced the eyes on first ... and ran into our first problem. The plan in her head involved pupils ... that floated, apparently. Nix that idea. After a few discussions regarding this impossibility, she resigned herself to "plain-old diamonds". Okey-dokey. Next was the nose ... that was a cinch: one circle, coming up! Then came the discussion of the mouth. Naturally, Norah wanted buck-teeth. The problem was that she didn't want a mouth behind them. Hmmmm ... that's a tough one. In spite of my logical reasoning that these 2-D teeth needed a mouth to give them dimension, she wouldn't budge. Brett, who was busily cleaning up the rest of the kitchen, tried to give his two-cents, but she was determined to have what was in her head. Eventually, I sent her to the computer to find me an image that matched her idea. Within a few minutes she was back ... with a smile: two buck-teeth ... with a mouth behind them. Alrighty! As long as it's your idea! :) Then we added a few whiskers, her paper ears and a cotton tail. I think that between the two of us (and the internet!), we ended up with a pretty cute little pumpkin-bunny!
Gimli "helped" to clean up ... ewwww!
Here are a few snapshots of our pumpkin creations all aglow ... and their proud owners.
We opted-out of him wearing the helmet.
Little Peter Pumpkin-Tail
Rah-rah-rah! Sis-boom-bah!
On Sunday afternoon it was time to get ready for trick-or-treating by getting the kids dressed up ... by far my favorite part of Halloween! It really is fun to dress-up and be somebody else for a spell. I love to see my kids as they take on the personality of this new person. They may not walk differently or talk differently, but they certainly pose differently for the camera! Right before the flash, they are suddenly embodied by the spirit of their character and they strike a pose! What a hoot!
Yo, Tulo!
Aaron decided early on that he wanted to be Troy Tulowitzki, the Colorado Rockies' short-stop. This was a relatively simple costume to put together seeing as Aaron had most of the gear in his closet. He had a Tulo jersey and baseball pants from Fall Ball. He also had the socks and batting gloves to go with it. We borrowed one of Brett's Rockies caps to complete the look. There was only one thing missing. Tulo has a mullet. Too late to grow one out, I afraid. :) Seeing as this is Tulo's signature look, it was important that I figure this out. A trip to Goodwill was the ticket: we came home with one abandoned doll, gave her a hair-cut, taped this hair with packing tape and attached it to the back of the ball-cap. Ta-dah! One Major-League ballplayer!
Norah also chose a relatively simple costume: Shawn Johnson - Olympic Gymnast! Seeing as our own little gymnast lives in a leo, this isn't much of a stretch for her. The significant differences to her costume were the taped wrists and ankle and the medal that she chose to wear. For her birthday, we bought her the warm-up suit, so when she finally got to cold in just the leo, she could bundle up and still look "the part". While Norah might just be "dressing-up", I think deep in her heart, she was the "real thing" last night!
Wow, Norah ... uh, I mean, Shawn! :)
Ashley, as I alluded to earlier, chose to be a cheerleader this year. She is in awe of our neighbor girl, who cheered for the first time this year, and it was pretty much just understood from Day 1 that this was the costume for her. We took a trip to Hobby Lobby about a month ago to buy fabric and a t-shirt. All the way there, Ashley was talking about her hot-pink costume. We came home with parts for a blue one. Go figure! :) I bought blue fabric for the skirt and then some sequined fabric to go on top for bling. For the t-shirt, I bought some t-shirt transfers by "Purple Chimp". Simply print your design on the transfer, peel off the backing and iron it to the fabric - super simple! I found a fun cartoon cheerleader design to use ... something that I think Ashley will enjoy wearing even now that Halloween is over. The ribbons in her hair and her pom-poms finished her ensemble! I'm not sure about the hot-pink tights ... maybe some of her left-over pink plans. My favorite part of her character, however, had nothing to do with her costume. It was her cheering. For the week leading up to Halloween, Ashley could be heard practicing the cheer her Auntie Allie taught her ... a tad bit modified:
A-W-E-S-N-O-P
Awesome, Awesome
Is what you are!
You're a mmmbdldmmd
Snooper Star!
Yep ... pretty awesnop! :)
Our patriotic hero-cutie.
Finally it was Lydia's turn to dress-up. Seeing as this is probably the last year that I can dress up little Liddy without having to consult her, I thought it would be fun for her to be one of my child-hood heroes: Wonder Woman! At the same Hobby Lobby trip as above, I went in search of some shiny fabric ... you know, the type that is impossible to sew! :) With plenty of input from the older kids, we came home with all the parts necessary. Then it was up to me! I have a standard pattern that I have used over the years for the kids' costumes. It has a pattern for shirts (long or short-sleeved), pants (or shorts) and a robe. Each time I use it, I fudge a bit depending of size and style, but I do follow it ... at least in the most basic sense of the word. :) This costume consisted of a long-sleeved red, satin shirt. It fit like a glove! I added the silver cuffs after the fact with the help of my trusty glue-gun. In retrospect, I would have sewed them on, but for this purpose, it looks great. Next I sewed her blue-starred skirt. Pretty basic - but fluffy. I also sewed the gold belt and attached it in the back with velcro. For the cape, I gathered the fabric at the top and sewed the silver edge and then used velcro as the clasp. Finally, I made her crown using a foam visor as the frame (good idea, Auntie Allie). I turned the visor upside down and traced the scalloped edge: kinda like this { only horizontal. I then used some of the left-over gold fabric and wrapped it tightly around the foam and hot-glued it in place. For the finishing touch, I also covered a star (cut out of the same foam) in some of the red, satin fabric and glued it in place. She looked so cute ... and powerful!
Once everyone was dressed it was time to head out to trick-or-treat with our friends and neighbors. The kids came back with, as Norah put it, "a quarter of my bag filled!" Oh, goodie! Then after a soup dinner (at least I think the kids ate soup ...) it was off to our church's Harvest Fest where the kids filled up the remaining 3/4 of their bags. Then it was time to head home and off to bed amidst the choruses of cries and weeping.
Yes, in spite of our fun, it's a tough trip back down from the Halloween highs! I'm pretty sure that they had a good time, even if my last interactions with my kids were as follows:
Aaron: "Aaron? Aaron, honey?" ... maybe already asleep.
Norah: "I feel sick ... too much candy."
Ashley: "I didn't have any fun today" sniff, sniff ...
Lydia: While screaming and crying she chucked her milk drink at me.
Hmmmm .... I'm sure our memories of last night will be better today. :)
While we don't go in for all the scary business of Halloween ... we certainly enjoy the creativity and lighthearted fun of this season. A wonderful weekend of memories, costumes and plenty of snapshots!
Happy Halloween!
Now I wonder how long until the kids start plotting their next costume ...
This past Saturday we celebrated Norah's birthday ... but as is typical, it's been a week-long party! Just last night she got a bag full of goodies from her Great-Uncle ... all girly, purple and sparkly. Perfect!
Norah, anxious for the party to start!
We started this party-week with a tea-party for my little sweet-heart. We had flowers, "real" plates, cloth napkins and the girls wore dresses. They even remembered to lift their pinkies when they sipped their tea!
I thought I would share with you our menu we served ... so you can enjoy your own little tea-party, too.
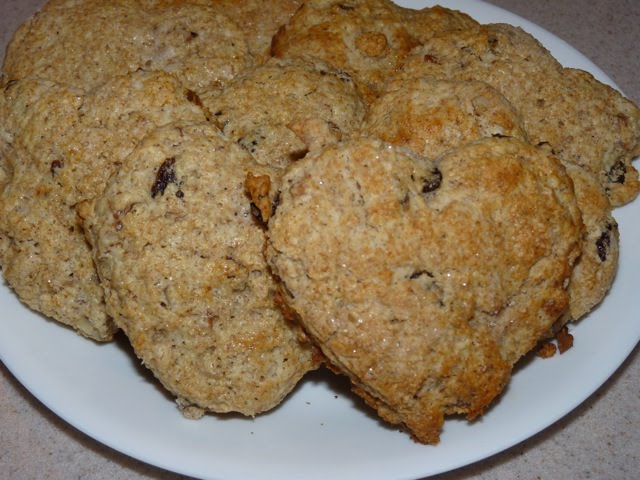
Raisin-Walnut Scones (This recipe is from Pillsbury: Best Muffins and Quick Breads.)
This recipe makes two batches of scones, so I only prepared half the recipe.
Ingredients:
2 cups all-purpose flour (I used half wheat and half white.)
2 T. sugar
2 t. baking powder
1 t. nutmeg
1/2 t. baking soda
1/2 t. salt
1/2 cup butter, softened
3/4 cup buttermilk (Add a teaspoon of lemon juice to regular milk.)
1/2 cup raisins (You can also use dried cranberries.)
1/2 cup chopped walnuts
1 egg, separated
2 t. sugar
Lightly spray a cookie sheet and preheat the oven to 375 degrees.
In a large bowl, combine flour, 2 T. sugar, baking powder, nutmeg, baking soda and salt. Mix well. With a pastry blender, cut in the butter until the mixture is crumbly. Stir in the raisins and nuts.
In a small bowl, combine buttermilk and egg yolk. Add this to the flour mixture and stir just until the dry ingredients are moist.
Rolled out and ready to cut.
On a lightly floured surface, gently knead the down a few times. Then carefully roll out the dough until it's about 3/4 of an inch thick. I used a heart cookie cutter to cut out the scones. Keep rolling out the left-over dough until you have used it all. Place the scones on the cookie sheet. In a small bowl, beat the egg white. Then brush each scone with a little egg white and sprinkle the tops with sugar.
Golden, glittery tops ... yum!
Bake in the oven for about 12 minutes or until golden brown. We served our scones with a little home-made apricot jam on the side. They were devoured! Who knew little girls could eat some much?!
Cucumber Sandwiches (This is a recipe I made up ... as usual!)
Ingredients:
Several slices of sandwich bread, we used wheat
Cream cheese, softened
Cucumber, peeled and sliced
Dried Dill
Ready to de-crust and slice.
Lay the number of slices of bread that you will need for your party out on the cutting board. (I made 5 sandwiches for our party and they were all gone!) Spread a little cream cheese on each side of bread. (If the cream cheese is too firm, pop it in the microwave on low for a few seconds until it reaches a good spreadability.) Layer the sliced cucumbers one one side of the bread. Sprinkle dill on top and put the sandwiches together. Here's the important part: cut off the crusts and cut them into triangles. That makes them special!
Toss all the fruit together in a bowl. If you are afraid of the apples or bananas browning, splash a little lemon juice on top and give it a stir.
We also had a few extra items on the table: a bit of the infamous (ever-lasting, apparently) pasta salad and some little cinnamon rolls from MOPS the day before. Anything to get those girls fed!
We offered a variety of teas to our tea-partiers. The favorites in our family are Celestial Seasoning's "Lemon Zinger", "Wild Berry Zinger" and "Madagascar Red Vanilla". My particular favorite is "Almond Sunset", which they have stopped making. :( My wonderful in-laws brought me 6 boxes from the factory last year (the last on the shelves!) and I have been rationing them.
The key to delicious tea, however, isn't the flavor so much as the cream and sugar! I buy sugar cubes to have on hand and the kids love to plop their own little cubes in their cups and watch them dissolve. I also set out a little pitcher of milk. Just so you know, cream will curdle in your hot tea, so a little splash of milk is yummier.
The tea-party was certainly a success! Hope you can enjoy a few tasty morsels with your next spot o' tea.
A few snapshots before you go ...
Making it look good!
Lydia samples the fruit and Ashley enjoys a sandwich.
This past Christmas, my mom gifted us three kids with a photo album (courtesy of iMac) of hundreds of pictures of our growing up years. She sat perched at her computer for hours upon hours sorting through bags of pictures (literally bags; paper, grocery bags to be exact) scanning them into her computer and then compiling them into this wonderful book of memories. After we finished tearing up and marveling at this labor of love ... the giggling began. Not only was this book full of sweet family memories (Yosemite trips, graduation, Christmases), it was also filled ... with us. Growing up in the 80's in Ridgway apparently meant that we were, ummm, well, for lack of a better word ... goof-balls. There were pictures we were glad to see ... and several more that struck fear into our hearts that anyone outside our immediate family might stumble across. These, of course, are the ones my kids latched onto. :)
Now as we come upon this fun time of year, Halloween, I thought that it would be fun to post some of our old pictures of when we dressed up. My mom often made our costumes, usually with parts from around the house, and I have vivid memories of my sister and I being clowns for several years in the full-body jumpsuits she sewed. I love that she made them so that they would accommodate a parka! Trick o' treating in Colorado often involves snow. I also have memories of my brother as a pirate ... puffy shirt and all. Aargh!
So ... I pulled out the disk my mom included with her album and started searching for these photos. To my surprise, it appears that we dressed up. A lot. And not always for Halloween. While I didn't find the clown or pirate pictures, I did find quite a few others. So ... without further ado, I give you Halloween Past ... with a generous dose of the Everyday Scaries!
Let's start off with a bang! Shall we?
This is not Halloween. This is Spirit Day at school. I hope. I would like to draw your attention to the layered socks that I have on - over my red leggings. I count four ... that's hot. I mean, like sweaty. :) Also, I'm not sure why my skirt looks tucked up on the sides - I'm sure it was "the fashion". As for Joshua, the bandanas are a nice touch and I like how his hair matches his shirt. Not an easy thing to do with tie-dye. And Allison is Josie Cool: shades with high-waters - awesome!
Joshua & I are so bright - Allison needs shades!
Next on the docket is a return to the 1800's. This isn't Halloween either ... it's Christmas, of course! This was our Christmas card that year ... which in context makes sense. I especially like the ringlettes and the derby hat. All that is missing are the stoic faces ... oh, wait. We do look a tad bit serious. Maybe the clothes are a bit suffocating. But I don't remember having to wear a corset!
Come on, kids - "smile!"
Here's one. Now I know that this is Halloween, but I am rather unsure as to what I am supposed to be. A fairy? (That would make me complimentary to Allison's Peter Pan costume.) But that doesn't look like any fairy I have every seen. Ever. Perhaps, I'm a bird. With feathers only on my face. Hmmm ... I'm not sure about the cape/veil ... or the lace gloves. Yep ... that is a mystery for certain.
I love Peter Pan's fairy dust bags on her belt ... so authentic!
Here is me as a ballerina ... on a non-Halloween night. Now I know where Norah gets it! It must be in our genes to run around in leotards! I actually remember this outfit. It came from my grandparents in Florida and I wore it. A lot. Until my feet didn't fit in the slippers anymore. But that didn't stop me from trying. Squeeze and scrunch those toes ... that's the ticket!
Lovely toe-pointing - good form! :)
In the next one, we are apparently going on safari. Or to school. I'm honestly not certain why we are dressed like this ... what Joshua is wearing as a belt ... or why I have a monkey in my hands. But, it's another wonderful example of our creativity in getting dressed up - it looks almost effortless. To think that we pulled this all together from our own wardrobes. Now that is Halloween-scary!
At least we're all smiling ... even the monkey!
Now ... I just want to warn you about the next one. It is pretty scary ... hair-raising, you might say. This one isn't from Halloween, either. If you look closely, it appears that this was how I liked to do my hair when ... I dyed Easter eggs! I think the combination of large horizontal stripes (as expected, not flattering) and the big, electrified hair is pretty scary. Shocking, really!
There's enough hair there to stuff a pillow, I tell you!
This is a Halloween picture of some guy - a chef apparently. The picture is a tad bit blurry, but he looks a bit familiar. Wait a minute ... that's my mom! :) I remember the story of her going to work at the True Grit Cafe dressed like this and people asking for Linda all day. Hmmm ... I wonder what sort of costume I could rig together that would make me unrecognizable ... just long enough to have a chance to go potty alone!
Bon Appetite!
For the next picture, we travel back in time again to the 1800's ... but this time it's the rough side of town. These four beauties are having a good time ... but don't bother them or they just might shoot you! Due to this picture being take mid-summer, you can imagine this was not Halloween. When the California cousins came to play, we had a tradition of getting Ol' Time portraits taken. So, "no" we didn't walk around town like this ... mainly because we had to use giant paper clips to keep the backs closed. Nope, nope, nope ... we didn't go trick o' treating in these get-ups!
Watch out! The one on the right has a shot gun!
The next Halloween character ... vould like to suck your blooood! Now worries, though, this vampire is pretty harmless. I don't think those fangs are real ... and I'm pretty sure that's a pirate in a vampire costume. (Take note of the puffy shirt.) Wonder who he really is! :)
He's a pretty smiley vampire!
In the next photograph are three little cuties on the ... on the Oregon Trail! Nope ... not Halloween. It's Labor Day. And we are not bumping our way down the Oregon Trail ... but down HWY 550 through Ridgway. In a parade. While the bonnets and boots are real ... I don't think the gun is.
Y'haw! Move along!
Here are two masked super heroes ... Superman and Supermidget! My mom, in her creativity, made these costumes for us. I wonder if she regretted that after the 124th day we wore them. There is a decoration in the back of a little black-hatted witch, which could mean that these were actual Halloween costumes. But I also know that I have pictures of us in these same suits ... in the middle of summer. So perhaps they were Halloween costumes with an extended warranty!
It's a bird! It's a plane! It's Super-Somebody ... and his Silly Sidekick!
These next little blondies are all dressed up, too. I remember my mom sewing these outfits. The shirts had ribbons at the collar that matched the belts. So cute ... for Cinco de Mayo. Yep ... we dressed up for everything!
Ole!
These next little old ladies are having a good time! Oh wait ... they aren't old ladies ... their, like, 10 years old! I vividly remember this day! We were out visiting the cousins in California and someone got the idea to get out Great-Grandma Ruthie's clothes. Hence the little ol' ladies! It was a hoot to see the personalities that each girl took on when they got dressed. They were transformed! Some had sass like Ruth McClanahan from the "Gold Girls". Others became slow moving and hunched ... like Estelle Getty.
Kinda makes you wonder what they'll be like when they are old!
Thankfully, this next one is from Halloween. Whew! That or my mom is actually a penguin! I especially love Allison's bling ... her plastic bling! Do you remember those charm necklaces ... I had an abacus that actually worked ... if you only needed to count to 45, that is. I'm also glad that this is Halloween, because Allie is wearing a tad bit too much eye make-up ... and her hair is blue ... and she has that geometric shirt on. As for me ... I'm apparently dead. That black bunch is not my hair, it's my veil. but it's probably masking my fantastic hair-do that I usually had. What was that? ... you ask. Well ... it's the same as Allison's (short on one side and long on the other), but the mirror-image. Cool.
Love the bite marks on my neck ... I'm sure they weren't real. :)
Here we have the frightening, floating heads in a flower garden! OOooooOOOoo! No ... wait. Hmmmm ... scratch that. Apparently they are three, regularly attached heads ... attached to almost matching floral shirts. Well ... you have to admit that this non-Halloween picture is still pretty scary. In it's own "I'm a teenager and I'm going to only kinda smirk" sort of way.
If you squint, we could be a three-headed person ... with a mystery arm.
Here we are all dressed up ... and ready for something scary! The Broncos at the Super Bowl ... one of the six times they went. And, no, they didn't win this time! At least I don't think so ... if you want real stats about the game, I am not the one to have that info. I do like the feathered hair (scary) and the acid wash skirt (scarier) and the flat-billed ball-caps (very scariest). Yep ... once again, it has Halloween potential.
Go Team! Or ... whatever!
This picture has all the possibility of being a Halloween thriller: big hair, crazy clothes, lots of make-up. But ... alas. This is from our Spanish Telenovela. We were all dressed up to film the TV episode we wrote. Now that must have been scary!
Mi Mejor Amiga y Yo :)
I thought I would leave you with one final, authentic Halloween costume. My favorite from my childhood. I was a Purple People Eater! Now you know where my creativity comes from: my mom. I love the crazy wig, the foil cuffs, the mysterious decal on my belly ... and the fact that my mom STAPLED the costume together with me in it! Imagine with me how the dressing went:
"Do you have to go potty, honey?"
"No."
"Are you sure?"
"Yeah."
"Are you really sure?"
"Yes, Mom."
"Positive?"
"Mo-om ... I'm fine."
"Okay..." ka-chunk, ka-chunk, ka-chunk ...
"There you have it. You can go potty in about 5 hours."
Love the pose ... I became the Purple People Eater!
Yes, indeed ... we practiced all year long so that we would be ready for Halloween. Such fun memories of being goofy, crazy, creative ... and sometimes, scary. But mainly just in our fashion-sense!
Have fun this weekend, stay safe and I'll have some fun snapshots of my own little costumed-kids next week!
Back when we lived in Greeley and before we had kids, every now and then we would join Brett's parents at a Rockies game in Denver. If you have ever been to a professional baseball game, then you know that there is a lot more going on than just the game. There is the "Take Me Out to the Ballgame" sing-along. They do the wave sometimes. There are snack vendors walking back and forth, up and down the aisles making sure that if you are hungry or thirsty, you don't have to miss a minute of the game. But, if you do happen to miss a play, don't worry! Up on the Jumbo-Tron you can see a replay of every play ... which is very important for me, because I don't always know when something exciting happens! :)
Which actually reminds me of my first major league game. We were out in California seeing family and we went to a Dodgers game; a whole bunch of us. Somehow, I ended up at the very end of the row - out of touch with the rest of the group, and apparently, the game. At some point, the rest of the family stood up and started getting their things together. I was caught up in all the action in the crowds and the noise, but had no idea what was happening on the field. I asked the person next to me, "Is it half-time?" To which they smiled, "No, honey ... the game is over." Huh ... that was fast! :)
Anyway ... also on the big screen they have pictures of the players, their numbers and stats and when a particular player comes up to bat, they shoot up their picture and profile ... and play their theme song. Sometimes the songs are current, popular songs and sometimes they are old favorites. I don't know if the individual players get to choose their own songs or if they are chosen for them ... sometimes the tune fits the players "look" sometimes not so much. This got me thinking, of course ... "What would my theme song be?"
What would I choose for myself or what would someone who knows me well choose for me? Hmmm ... those are good questions! The fun songs that come to mind would be, "She's a Maniac"* by Hall and Oates or "Rain Drops Keep Fallin' on Head" from Butch Cassidy and the Sundance Kid, or maybe something silly like ... "Take a Load Off Annie" by The Band. (Which as kids we were convinced was "Take a Load off Fanny" ... much more entertaining to sing!)
In spite of the songs that come to mind ... it appears that my children have already chosen a theme song for our family. How do I know? Because they play it constantly and have choreographed a number of dances to it. See?
This song, the dancing and the words, actually are a pretty good reflection of our life. Our life, like this semi-choreagraphed dance video is almost always on the edge of chaos. We are often off doing our own thing and going in our own directions with moments of coming together ... of being synched ... like dinner time. We each have our own abilities and skilz. :) Some of us like to stand off to the side and observe, taking it all in (Lydia). Some of us take center stage and show everybody what we are made up (Norah). Some of us want to be more than we are right now and we run around trying a little bit of everything (Ashley). While some of us are so confident and cool that we share bits of ourselves and then let others do their thing (Aaron). In our life, keeping the song in mind, we also have times when we make mistakes and have to either move on, or make it work. I love how my kids just throw themselves in to their dancing and whatever happens happens ... and if it's not quite how they intended it to be ... they fake it!
As for the words to the song ... while it doesn't seem to be relevant to our family (Have any of us ever been to a dance club?!?) ... It appears that it does fit us. Here's how I see it:
Dynamite
by Taio Cruz
I throw my hands up in the air sometimes (Yeah ... me, too, sometimes, but probably for different reasons.)
Saying AYO!
Gotta let go! (More like, "Liddy, please let go of Mommy's leg" ... but kinda the same.)
I wanna celebrate and live my life (Yeah ... gotcha there ...)
Saying AYO!
Baby, let's go!
I came to dance, dance, dance, dance
I hit the floor (Did you see Aaron hit the floor ... He's on the floor a lot. Maybe the gravity is stronger here.)
'Cause that's my, plans, plans, plans, plans (Many of my plans are the "fly by the seat of my pants" kind.)
I'm wearing all my favorite
Brands, brands, brands, brands (Does Wal-Mart count? How about Target?)
Give me space for both my hands, hands, hands, hands (We have an entire house and all of six of us are right. here.)
Ye, ye
Cause it goes on and on and on (Yep, some days are like that ...)
And it goes on and on and on (Yeah ... the longest days of my life have been within these four walls.)
Yeah!
I throw my hands up in the air sometimes (Sometimes I also grab my hair.)
Saying AYO! (Not sure about this part ...)
Gotta let go! (Yes ... please let go of Mommy now.)
I wanna celebrate and live my life (That's my plan, at least.)
Saying AYO!
Baby, let's go! (I like when Brett says, "Let's go out.")
'Cause we gon' rock this club ("Club" as in a group of people, right? ... we are our own little, twelve-legged club.)
We gon' go all night (That's pretty much all I remember of the first few months home from the hospital.)
We gon' light it up
Like it's dynamite! (Sometimes our house looks like it's been hit with dynamite.)
'Cause I told you once
Now I told you twice (I'm afraid I say that ... "Don't make me tell you again..." Ugh.)
We gon' light it up
Like it's dynamite!
I came to move, move, move, move
Get out the way me and my crew, crew, crew, crew (There at times in small spaces [doctor's offices] when I feel like this about our many-membered family.)
I'm in the club so I'm gonna do, do, do, do
Just what we, came here to do, do, do, do (We moms do and do and do ... and then we do some more.)
Ye, ye
Cause it goes on and on and on (Yep ... and on and on .... and on ...)
And it goes on and on and on (Are we done yet?)
Yeah!
I throw my hands up in the air sometimes (Sometimes I also close my eyes and try to find my happy place.)
Saying AYO! (Sometimes I say "All. You. Out." That could be it.)
Gotta let go! (Please let go ... Mommy just wants to go potty ... alone.)
I wanna celebrate and live my life (I'm trying.)
Saying AYO!
Baby, let's go!
I'm gonna take it all like,
I'm gonna be the last one standing, (Usually it takes me 15 minutes to get to my bed after I say goodnight ... just a few things to get done first ... dishes, laundry, tidy up ...)
I'm alone and all I (Well ... no, not really alone ... but still sometimes lonely.)
I'm gonna be the last one landing (Hopefully into my bed.)
'Cause I, I, I Believe it
And I, I, I
I just want it all, I just want it all (I still want it all ... I'm just afraid I won't be able to stay awake for it.)
I'm gonna put my hands in the air (Do I have to?)
Hands in the air (Okay, okay ...)
Put your hands in the air (They're up already ... sheesh. Maybe use your manners, next time.)
I throw my hands up in the air sometimes (If all else fails, I also pray for patience.)
Saying AYO!
Gotta let go! (How long until Daddy gets home?)
I wanna celebrate and live my life (Help me, Jesus, to celebrate my life ... even the days of endless diaper changes.)
Saying AYO!
Baby, let's go! (Just you and me? Out? For dinner?)
'Cause we gon' rock this club
We gon' go all night (Hopefully not tonight. Hopefully tonight will be a sleeping night.)
We gon' light it up
Like it's dynamite! (Well ... yeah ... life can be like that, I guess.)
'Cause I told you once
Now I told you twice (Okay ... I'm listening.)
We gon' light it up
Like it's dynamite! (Hey ... Yeah! I got it ... dy-no-mite!)
(Oh ... is it over already? Can we play it again?)
__________________________________________________________ *This was the song that my sis-in-law woke up singing on my wedding day ... sort of prophetic of her! :)
When we were kids, I remember watching The Blues Brothers. Jim Belushi and Dan Akroyd starred as two blues-playing brothers who were raised by nuns in an orphanage. They learn that their home is going to be closed down unless the nuns can pay the back taxes that are due. So ensues their "mission from God" ... organize a gig and give all the proceeds to the orphanage. The only trouble is that they are both hoodlums. :) Anyway, the parts that I remember the most vividly are the car chase through the shopping mall (I think we tried to count how many cars were crashed in this movie ... but lost count somewhere in the 100's) and the song by Aretha Franklin in the diner. That scene of Aretha singing her lousy, no-good man out the door was my introduction to the Queen of Soul. As it turns out, she was famous for several R & B songs ... perhaps the one she is best known for is "Respect". Now while this songs mainly focuses on a relationship between a man and woman and her desire to be treated right ... I think it rings true for everyone. We all want respect ... and that includes our kids.
Almost nothing breaks my heart more than to see and hear a parent or care-giver being disrespectful to a kid. These children are given into our care for the purpose of training them up and caring for them. We truly are an advocate for our children and need to be their protectors ... not the one who dishonors them. Too often, we forget that these little people are just that: people; and we interact with them in ways that we would never do to another human being.
At the store the other day, I ended up trailing along another mom and her daughter as I shopped. (You know how it is ... from aisle to aisle you keep bumping into each other.) Everything seemed normal enough. Then we both ended up at our cars at the same time and in the "privacy" of her van, the mother verbally let the little girl have it. It broke my heart to hear the mother speak so gruffly and hurtfully to her daughter. It was poison in our ears. Poor Ashley looked at me and said, "That's not very nice. That makes me sad." I stood outside our van for a few seconds, wondering if I should say or do something and then the opportunity was over and the mom drove away. I don't know what I would have done if give a bit more time, but obviously the scene has stuck with me.
Maybe she was just having one of those days ... I want to give her credit for that. I will be the first to say that I have had days when my mouth was not loving or respectful. I have had days when I made my kids cry at the breakfast table (great start to the day, Mom!) because they were being kids (i.e. bouncy, giggling and goofy) and I was a grump. I have had days where I felt like I was apologizing for my "icky" words all day long. But ... that is not my usual interaction with my kids and it is not a habit that I want to get into.
When I am careful and respectful in the words that I speak to my children, not only am I honoring them, but I am modeling to them how to speak with other people. I am my kids' most influential teacher and without a doubt I want to teach to them what I in turn desire to see and hear from them. You know as well as I do that our kids hear what we say and then turn right around a say it. Maybe not right that minute ... but you will hear your words again soon. :)
I love when I hear my kids saying sweet things to each other. And my ears cringe when I hear the other stuff! When it's loving, I think to myself, "What sweet kids ... " When it's rude, I think to myself, "Where did they hear that?!" Sometimes the influence is from the TV or something that a friend said ... but unfortunately I have to take ownership for some it. Usually what I hear back as an icky-echo is not so much the words, but the tone of voice used. It's absolutely horrifying to hear your little four-year old say, "Sto-o-op. You're makin' me nuts." With that little huff and sigh. It stops me in my tracks to hear my exasperation come out of my little person. Along the same lines, Lydia has a few new phrases: "Stop" and "Down". Any idea what she has been hearing a lot? :) They hear it ... they say it.
Teaching our kids manners is a perfect example of this. When I want my kids to say "please", it's essential that I say it, too. Same for "Thank you," and "You're welcome." If I say, "Give that to me," the odds are good that I will later hear, "Give it to me." In contrast, if I say, "Can you give that to me, please? Thank you." ... there is a good chance that my child will put that little tidbit away in their head & heart and use that phrase when he needs something. That, of course, is not guaranteed, but practice does make perfect.
I had a friend in Bible study a number of years ago who was a great encouragement to me. Her youngest was just a tad bit older than my first. She was a mom who helped me to keep perspective and see the finished product I was working towards. (I recommend every mom to have one of those!) She told me one time that she spoke to her children as if they were the neighbors' kids. Ha! You wouldn't talk to the cul-de-sac kids with sarcasm and rudeness ... so why would you with your own kids?! I loved this advice for two reasons: it revealed to me that she struggled with being respectful with her kids, too (validating!); and it was something easy that stuck in my head and was came readily to my mind (practical!). Since that little chat eight years ago, a day doesn't go by that I don't think, "Would I have said that to so-and-so next door? Would I have said that with such an exasperated tone?" It is a great mental check for me in the middle of my interactions with my kids ... and the cul-de-sac kids.
So ... what does this look like in the normal day-to-day? Well ... sometimes it means a "time-out" for Mommy until I cool down and can speak nicely. Sometimes it means a "close my eyes and clench my hands" moment before speaking calmly. Sometimes it means making a concerted effort to say "Please," when what I want to say is, "NOW, NOW, NOW!" It is a decision I am making to speak respectfully and then I have to ask God to help me. And it requires some practice in my part, too ... see above. :)
Now honestly, is every word that comes out of my mouth going to be measured and honoring? Nope. I truly need God to transform my mind and mouth to be respectful and edifying in the words that I speak. I also need to surround myself with people and influences that will help me ... I also speak what I hear, so I want to hear good stuff so I can share good stuff. I also need to apologize to my kids when I mess up and ask for their forgiveness. This habit is two-fold: my relationship with my kids is restored and they see first hand the importance of being authentically apologetic. Another modeling opportunity for Mom! :)
Ashley has been saying a little sing-song verse for the past several days that sums up what God thinks about how we should treat others. "Do for others what you want them to do for you." It's our good old Golden Rule (Luke 6:31). It really does make sense. If we treat others the way that we would want to be treated (with respect and honor), our world really will be a better place ... and our families will be better, too.
So ... share a little R-E-S-P-E-C-T with your little ones. Sock it to 'em! :)
P.S. We had another KEBL night last night. The song we studied was "Abre Mis Ojos" ... not familiar. Better check it out!
During my weekend down at my sister and mom's house, we got crafty! That is one of my favorite ways to spend time! We made three different decorations for Norah's birthday party and I thought I would share with you the super-easy directions so that you, too, can be empowered to make them! I love the simplicity of the silhouettes ... coupled with the bling of the rhinestones!
First I did a little "Googling" on the web for gymnastic images. There were several images that were just silhouettes while there were hundreds of images that could be used as outlines for your silhouette. I selected three poses that I thought would work and saved them to a Pages document.
Then we went shopping ... to Stuff-Mart (aka Wal-Mart)!
For the cake topper, we purchased black foam board and glitter craft spray. We had the rhinestones already. I also bought a thin dowel to use, but I ended up using toothpicks to stick it into the cake.
For the banners, we purchased the fabric (about 1 1/2 yards for each), 2 dowels (one for each) and the ribbon (complimenting our colors). We had on hand the black acrylic paint, rhinestones and letters from a paper craft bin.
First my mom hemmed the pink fabric and sewed a sleeve on top for the dowel to slide into. While she was working on that part of the project, Allison and I started the cake topper.
We printed the silhouettes on computer paper and then used my mom's projector. The projector makes it very easy to shine the silhouettes up on the wall and then trace them. We traced the cake topper silhouette on white paper first and then outlined that on the black poster board. (We found that it was too difficult to see the shadow on the black paper, but for the fabric we traced the image directly to the fabric.)
When the cake topper was traced out, I used an exacto-blade to cut along the lines. I then used some sandpaper to smooth out the edges of the figure. Next we took her outside and sprayed both sides with the glitter spray and let her dry. Finally, we glued two little rhinestones on each side right at the figure's pony-tail. Just the right amount of bling!
She is stuck in the cake with the help of toothpicks.
By this point, the sewing was done and we could trace the figures on the fabric. Before we started painting, however, we took them outside and gave them a good spray with the glitter. Then we spread the fabric out on the work-table and painted in the image with the back acrylic paint. We hung them outside to dry. I love the contrast of the hot, sparkly pink and the flat black silhouette. So sharp!
Next it was time for the words. We used three different letter brads and spelled out 10 different gymnastic terms: handstand, cartwheel, leo, splits, etc. Then we spelled out the words along the curve of the image. Once we had the letters placed the way we wanted them, we glued them in place with our trusty glue-gun. (Actually this was a lousy glue gun, but it still did the job!)
Pointy Toes!
Saluting Hands!
Then it was time to hang them. We slid the dowels into the sleeves on top. We cut the ribbon to the right length (leaving some to hang down). To glue it to the dowel, we applied a generous amount of hot glue to the end of the dowel and wrapped the ribbon around the front. If you looked at it from the back you would see the seam where the ribbon is gathered around the front.
Finally it was time to embellish a bit. We had some large rhinestones that we clustered in the corners and hot glue gunned in place.
Ta-dah!
On the Balance Beam
A Back Kick-Over
We will hang these on Norah's side of her room ... to help make it a little special for her.
While our banners are very girly, you could easily do the same for a boy. Any silhouette will do and then the appropriate fabric, embellishments a paint. I could picture a banner with a silhouette of a baseball player swinging his bat or a guy on a mountain bike ... just imagine! :)