Nope, it's not "Hum-Drum Monday after Christmas".
It's not "Take the Random Christmas Kilt Kit back to Target" Day.
It's not "Dump the Christmas Cookies Down the Garbage Disposal" Day.
Or "Heft the Christmas Toy Packaging to the Curb" Day.
According to my calendar (that I made last year) ...
it's "Cut Paper Snowflakes Day"! Yeah!
This is especially important this year because it's the only snow we've seen. :( I'm certain that I'll be grumbling about the snow come February ... but I'd still really like to see some now!
Anyhooo .... the kids and I had a lot of fun making some paper snowflakes last week for our Christmas dinner decorations:
 |
| Lydia kept busy with a little solo game of Battle Ship. |
 |
| Norah makes her deliberate cuts. |
 |
| Ashley's own interpretation of a snowflake. :) |
Such fun!
We ended up with a wonderful variety of sizes, shapes and designs ... with a few, frosty blue ones thrown in for fun.
 |
| Such focus and attention to detail. |
As it turned out, Aaron is our resident snowflake maker. He was amazing ... and completely out of our league! While we girls were making cautious little snips, triangles and curves, Aaron was boldly cutting huge zig-zags, arrows and hearts. When we unfolded our creations, it was always a little more exciting to see what Aaron came up with ... intricate designs and stunning patterns. I guess this was an example of where a little extra boldness results in truly astonishing beauty. (It also resulted in several snowflakes snipped to smithereens ... but that's a risk he was willing to take!) Two little lessons, I should take to heart! :)
 |
| Ooohh! Aaahhhhh! |
So that you can join us in "Cut Paper Snowflakes Day", here are some very simple directions that I got from Norah's teachers. We made about a million of these little guys one morning at school with the 2nd graders ... so you can master this, too! Just follow along and you can make it look like a blizzard has struck you house, as well!
1) Get a square piece of paper. You can use 8.5 x 11 paper and trim off one end to make a 8.5x8.5 inch square. I rummaged around in my craft supplies and found some blue 12x12 inch scrapbook paper for a few bigger snowflakes and some pretty mulberry paper for a few delicate looking snowflakes. Of course, you could use hot pink scrapbook paper ... and have either hot pink snowflakes (Norah would love that!) or just turn them over ... seeing as that side is white, and all. :)
1) Get a square piece of paper. You can use 8.5 x 11 paper and trim off one end to make a 8.5x8.5 inch square. I rummaged around in my craft supplies and found some blue 12x12 inch scrapbook paper for a few bigger snowflakes and some pretty mulberry paper for a few delicate looking snowflakes. Of course, you could use hot pink scrapbook paper ... and have either hot pink snowflakes (Norah would love that!) or just turn them over ... seeing as that side is white, and all. :)

2) Fold the paper in half.

3) Fold the paper in half, again. You should have a small square. Now unfold it, you will use the crease in the center as a guide.

4) At this point, make sure that the opening of the folded paper is facing away from you. Otherwise, things get funky!
Fold the right side of the paper in towards the center crease. You will now have a crease at the half point and a crease at the one-quarter point. Open it up again.

5) This is where it gets just a tad bit tricky. Take the left corner closest to you and fold it so that it touches the one-quarter point crease. You will have a tail sticking up above the top line of the paper.
 |
| Yes ... I'm wearing a pop-bead bracelet that Ashley made me. |
6) Now take the right corner that is closest to you and fold it across the paper to make a triangular tip.

You will have something that looks like this:

7) Take this funky triangle and fold it in half. Now you have the paper folded to make a 6 pointed snowflake.

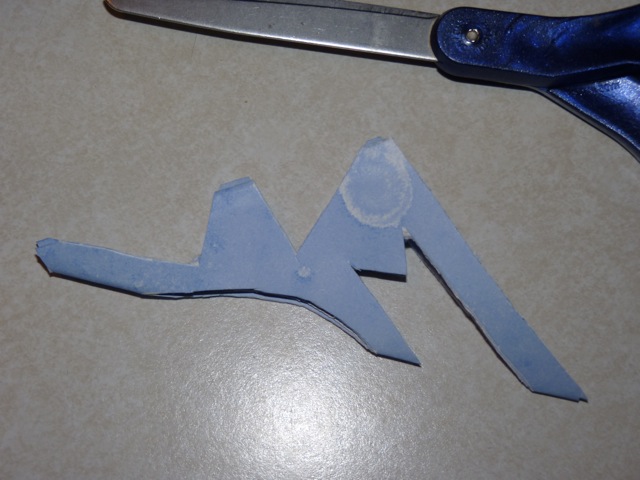
8) To have points on your snowflake, you want to cut the bottom at an angle. For a round snowflake, simple cut straight across.

9) Here is an example of my cuts. If you want Aaron's more dazzling snowflakes, think: Bigger and Bolder!
And here's the finished product! So pretty!

To flatten out your beautiful creations, slide each snowflake between to pieces of paper and iron them on low. Of course, my kids (as always) were surprised that we owned an iron. Yes ... I just don't use it very ofter. If ever.
Here are a few of our other favorites ... for your inspiration and viewing pleasure:
Here are a few of our other favorites ... for your inspiration and viewing pleasure:
Even Ashley ended up with some lovely snowflakes by simply folding the paper into fourths and snipping, snipping, snipping.

Norah was recovering from a slumber-party hang-over, but she still managed to cut and create some beautiful and unique snowflakes.

Here are a few of my favorites. Even with my cautious approach, they turned out lovely.

Finally, here are Aaron's favorites. He certainly has a creativity that is lacking a bit in his mother's. :) He was like Michaelangelo ... freeing the snowflake from the computer paper! :)

So ... what are you waiting for?!? Grab some paper and scissors and get cutting ... create a blizzard!
We tried this today, and Mallory said, "That's amazing, Auntie Morgan! Thank you!"
ReplyDeleteYou're welcome, Mallory! :) Tell your mommy to post some pictures! :)
ReplyDelete