Showing posts with label DIY. Show all posts

Tuesday, April 17, 2012

small things {flower power}


small things #10 ... flower power

Everybody has that thing their kids do that makes them crazy.  That thing that truly isn't a big deal, but over time (day after day after day) and through insane persistence (really?  again??), that little thing, transforms into a big deal.  A really big deal.

For me, that thing was the inability of the bathroom hand towels to stay on the rack.  Ever.  At all.  In any way.  I am quite certain that the culprit is the smallest person in this house ... but the other bigger people have been accomplices in stepping over said towels.  Which adds to my head-holding.

I thought about counting the number of times I picked those coral and green towels up off the floor.  How many times in a day would it be?  But then I decided it would probably make me cry, so I didn't.  

It's really not a big deal.  Pick the towels up and re-hang them.  And re-hang them.  And re-hang them. Suddenly I have a grumble in my re-hanging.  And a twitch in my left eye.  One more re-hang and Snap! I start growling.

I don't like to growl.  So I came up with a solution.  

Join me on my journey to less re-hanging.  Less grumbling.  Less twitching.  And less growling, too.

Upon entering the bathroom, I might find something like this:


Not technically needing to be re-hung.  But not exactly pleasing to my twitchy eye, either.  I would also like to note that this would most likely be the result of a taller and older hand-dryer ... making other bathroom users look a little bit guilty.

The towels might also be in this condition:


And a little damp, as well.

Or, perhaps this technique:


Not actually on the floor, but not nearly on the towel rack.  And still damp.

Because of the apparent increased gravity forces in our bathroom and the inability of the towels to stay hung, I often looked like this:

Oh, my head!

Or perhaps more like this:

Hang. Them. Up!

Certain that this towel trouble is not unique to our home, I did a little Pinterest search.  To my surprise, I found only two solutions and both of them required sewing.  One showed how to stitch velcro to the ends of the towel to make a loop that hung over the rod.  The other instructed how to stitch the towel into a loop resulting in the need to remove the towel rack every time a new towel is hung.  Hmm ... not what I was looking for.

I headed to JoAnn's Craft Store with a vague solution in my head.  And my fingers crossed.

I came home with these:


Giant safety pins without the little loop on the end and a package of Clip-Eez.  The flowers have a little metal clip on the back with sharp little teeth that grab.  (Even your finger if your not careful.  Ouch.)  According to the package, the little Clip-Eez, "clip onto flip-flops, slides, hair bands, jeans, scarves, bracelets, belts, jackets, handbags, shirts and so much more!"  This project fell under the "so much more."

I pulled out my trusty glue gun and assembled the pins and flowers:


A little dot of glue was all that was necessary before closing the clasp over the back of the safety pin.  (Watch your fingers ... see above.)  Once the glue cooled, they were ready to try on the towels.

I found that I needed to widen the pin a bit in order to poke through the four layers of fluffy towel, but the pins were plenty large enough to accommodate all the fabric.  I also chose to hang the towels long (with most of the towel in front and only a few inches in the back) in order to make the new situation work for my shortest hand-washer.

Now our towels look like this:


And I look like this:


Now here's hoping they don't pull the entire rack off the wall. :)

Flower power ... hand towels hung, less growling by me and I only spent $4.98 and 15 minutes.  Priceless.
__________________


I hung the flower pins this past Saturday and I haven't re-hung a single rumpled, wrinkled towel.  And the wall is still standing.


Tip Junkie handmade projects

Tuesday, January 11, 2011

DIY - Curtain Pull Backs

Well ... yesterday's post was a doozy!  I got tired just reading through it again to proofread!  So today's post is simple and sweet.  Nothing exhausting, taxing, exasperating or challenging about this task! :)  But with a similarly satisfying end.

We have a window in our family room that needed some help.  I liked the curtains.  I liked the valance.  I didn't like the ties.  They were heavy, awkward and the kids were constantly untying them and leaving them in a heap on the floor.  Or, if they tied them back up, they were lopsided and lumpy.  Not the look I was going for.

It even kinda looks like a sad face ... "help ..."

I went to Target to look at curtain pull backs and choked.  Really?!?  Thirteen dollars for a simple metal hook?  For ONE simple metal hook?  Don't curtains usually come in pairs?  I looked through the options there and just couldn't bring myself to spend almost $30 on this window.

Then, as we were leaving, we walked by the hardware area.  This aisle featured drawer pulls, cabinet knobs and .... robe hooks!  For $3.00.  Both of them.  Together.  $3.  That's more my style! :)

Inexpensive and simple ... and, did I mention, cheap. :)

I was so excited at my find.  Not only were they cheap, but they were a lovely "tarnished bronze" color and they were going to be super easy to screw into the wall.  With my rusty, trusty screwdriver, measuring tape and pencil, I was able to mount my simple curtain pull backs in about 5 minutes.

Measuring and marking for the holes.
Be sure to measure from the windowsill on both sides so that they are level.  Also, I measured in about 1.5 inches from the edge of the window so that they were the same on both sides in that sense, too.  Symmetry is important.  Or else you might have to walk around with your head cocked to one-side so that it looks right. :)  Not that I've ever done that.

Mounted and ready to go!
Notice that the hook is placed with the opening pointing away from the window.  This will allow the curtain to be tucked back into the hook.

I love the new look for this window.  I love that my little Ashley can tuck the curtain behind the hook when she wants a little sunshine.  And unhook the fabric when the sun is too bright.  No more, "Mommy!  The sun is too bright on the computer screen!  Mommy!  Mommy!  Mommy!  It's too bright!"

And I love that I spent $3.

Ta-dah!  ($3)

Wednesday, December 1, 2010

DIY - Holiday Pillows

When we were expecting little Aaron, we started a fun, family tradition.  And now, eight years later, we're still enjoying it!  It's simple.  It's sweet.  And, it involves sleeping.  :)  I had visited a craft fair the Christmas before Aaron was born and stopped by a booth that was selling pillowcases.  Not just your average pillowcase, but holiday pillowcases.  There were so many delightful holiday fabrics:  snowmen, holly leaves, Christmas trees, and angels.  After much browsing, I chose a pillowcase with a navy blue background and a variety of snowmen dancing across it.  I bought it with the intent of using it on Aaron's bed ... whenever he got old enough to use a pillow ... like in two years.  I'm a planner, alright!

The tradition of the holiday pillowcase is that on Thanksgiving night, we switch out our regular, old, boring pillowcases for our special, Christmas, wintery pillowcases.  And in Brett and my case, flannelly warm, too!  For the month leading up to Christmas, we snuggle into our beds, resting our heads on our Christmasy pillowcases ... while visions of sugar plums dance in our heads!

It is such fun to see the kids' excitement as well when they head to bed only to discover their special pillow fluffed and ready for ushering them off to dream land.  A few Christmases ago I made pillowcases for our entire family (cousins and grandparents alike) and it is fun knowing that they just might be sleeping on their holiday pillows, too!

I want to share with you the super-duper easy pattern for making your own holiday pillowcases.  I use the word, "pattern" lightly as it's a bit of a "make it up as you go along" pattern.  :)  But ... if you can sew a straight line, you can make this.  And even if you can't ... remember you will be filling the fabric with a lumpy pillow, so it doesn't really matter if it's straight or not! :)

First, head off to your nearest fabric store.  There are hundreds of fabrics to choose from:  cutesy, elegant, traditional and contemporary.  I chose two girly fabrics for Lydia and our niece.  They are pink and precious ... just like our girls!  I also chose a flannel fabric so that it would be soft.  

"In Winter there is snow and the snowman can play."  

Once you have made your fabric choice, you will want to have one yard per pillow.  I ask the fabric store employee to cut the fabric in one yard increments if I'm using the same fabric for each pillow.  That will save me work later.  Of course, I highly recommend choosing a different fabric for each family member ... that makes them even more special and personal!

Next, get your sewing machine up and running.  You will want some space to lay out the fabric and you will also want some straight pins.  Put your scissors aside.  You won't need them.  I told you it was easy!

Now, this is important.  Go get a pillowcase.  You need this for two reasons:  1) So you can see what one looks like and how simple they are put together, 2) So you can make sure what you sew will fit around a pillow.

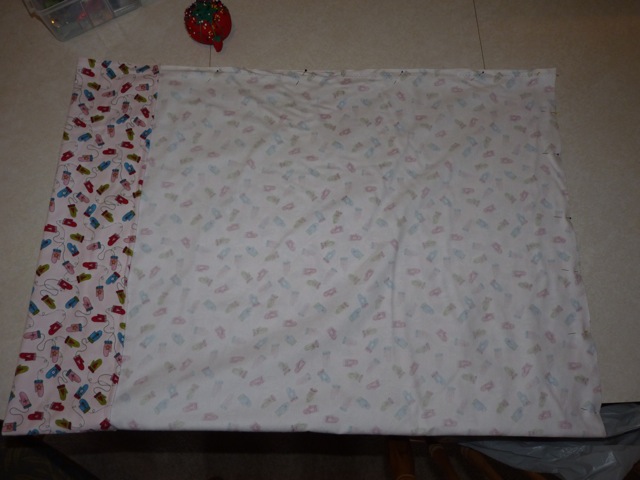
Now for the pinning.  When you got the fabric, it measure 45" across, but it is folded in half.  You want to unfold the fabric and lay it on the table with the wrong side facing you and the crease running up and down in front of you.  Take the edge closest to you and fold it up about 4 inches.  Then turn that edge under and pin it.  You should have a 3 inch seam with the rough edge tucked up inside.  See the picture below:

The hem for the open end ... about 3 inches deep.

Once that is pinned all along the top, sew a straight stitch from one end to another, making sure to catch the tucked edge.  This will be the opening of the pillowcase.

Next, you will sew the pillowcase closed.  Fold the pillowcase in half again, but with the wrong side facing out.  Match up the edges of the fabric, making sure the corners meet.  Pin the fabric together along the long and short side to keep the pillowcase together.

The fabric is folded in half ... ready to pin.

This side is stitched with about a 1" hem.

Now it's time to sew a straight stitch from the opening end down the long side.  When you get about 1" from the bottom, make a 90 degree turn and sew the bottom/short side.  Turn the pillowcase right side out and ... ta-dah!

Fluffed and ready for snuggling!

It took me about 15 minutes to do one pillowcase.  That's it.  It took longer for me to drag the machine upstairs and clean up the 30 or so teeny-tiny beads that Lydia dumped all over the table!

I hope this inspires you to start another delightful holiday tradition ... and may all your dreams be Christmasy bright!!


Thursday, October 14, 2010

DIY - Pillow Covers

A few weeks ago, I had a friend from church ask if I could sew a pillow cover for her.  Somewhere, somehow she had been fed some faulty intelligence ... something about me being "an excellent seamstress".  Ha, ha!  Double ha!  I'm just a good faker! :)  Thanks for the compliment, though.

Anyway, I thought I would do a little step-by-step pillow cover demonstration for this post.  Then you'll see that you can be an excellent seamstress, too ... or an equally adept faker.  The pillow I made was about 12 inches square and the cover is removable via a flap in the back.  Here's the scoop!

First, clear the dining room table. :)  You'll want a little bit of room for the sewing machine, but also some space to lay out the fabric.  The fabric I was working with was a heavier, upholstery fabric which required a heavier thread, but you can use any fabric you like.  You will want enough fabric to wrap around the pillow with a little left over for the seams.  See how super technical I am? :)  As you can see from the following picture, I left about a half inch at the top and bottom of the pillow and the fabric on the left and right will fold over and over-lap the back of the pillow.

If you choose fabric with stripes, it's super easy to cut the fabric straight.

Next, I hemmed the two short edges of the fabric.  Using straight pins, I folded the edge over twice (being sure to have the rough edge tucked into the hem) and then stitched it shut.  As you can see from the photo, the hem ended up being about 1/4 of an inch.  If this is your first sewing project, you can make the hem deeper and easier to sew ... just be sure to start with a bit more fabric.

I love my faithful tomato pin holder ... keeps all the pins at my finger-tips!

After I had the two short edges hemmed, it was time to pin the long edges.  First I laid the pillow in the center of the strip of fabric with the "right" side of the material facing the pillow.  (You will sew the pillow cover inside-out so that when you turn it right-side-out later the seams are on the inside.)  Then I wrapped the fabric around the pillow so that the edges over-lapped in the back.  I pulled the fabric snug around the pillow and then put one pin at the top of the pillow holding the three pieces together (two edges and front of pillow cover) and one pin at the bottom in the same way.  Then I carefully pulled the pillow out, leaving those two pins in place.  Before sewing, I put a few more pins along the top and bottom to help hold the fabric in place.

Here I am finding the place for the pins before sewing.

Next, I stitched along the top and bottom of the pillow cover - being sure to catch all three layers of the fabric at the point where they overlap.  I chose to double stitch these two seams to make sure that it was secure.

Finally I turned the pillow cover right-side-out and put the pillow form into the cover.  I found a complimentary button to stitch to the part of the fabric that over-laps ... then it looks like the pillow has a button closure.  See ... told you I was a good faker!

Ta-dah!

Proof that pillow covers are a cinch!  I have two separate sets of pillows for our living-room futon:  flowers for spring, summer and fall and snowmen for winter.  It's fun and refreshing to have a little something different as the seasons change.  

So ... if you have a room that is needing to be spruced up a bit, pillows and curtains are some of the easiest and most inexpensive ways to make a change.  Happy sewing! :)

Tuesday, September 28, 2010

DIY - Bulletin Boards

A few weeks ago, I conquered the unruly school shelf.  Which, I'd like to add, has continued to stay organized and tidy ... without any mommy-help.  It has been wonderful to have the kids keep track of their own school folders, papers, books, etc. and I have not made one trip to school to bring anything anyone forgot ... boo-yeah!  But ... we still had the problem of lost slips of paper, forgotten reminders of upcoming events and misplaced teacher notes.  In light of this, it became quite clear that a bulletin board was in order, but not just any bulletin board.  I wanted something cute. :)  So, I thought back to an article I had read in a recent FamilyFun magazine issue.  I don't have a subscription (yet!) to this magazine ... I had one a few years ago, but found that my life was too full to actually sit down and read it or put any of their wonderful, ingenious, creative ideas to work.  The typical, cyclical irony being that by the time I actually had the time to enjoy their ideas, my kids would be all grown up and the suggestions irrelevant.  But ... I digress ...

Seeing as I don't usually follow directions anyway, I figured I could fake it and make something that would work.  It ended up being so easy ... I made four! :)  So, if you can wrap a present, have a way to make things stick (a hot glue gun is my tool of choice ... I wouldn't recommend chewing gum!), extra fabric odds and ends, any extra embellishments lying around and an empty diaper box ... you're good to go!

My odds and ends ... and gizmos

First, I flattened the cardboard box down.  (For the smaller ones I made for the kids, I cut the box in half and had two forms for two separate bulletin boards.)  Then I laid the fabric on the counter, smoothed it out and laid the flattened box in the middle.  I then wrapped the fabric around the side and ran a bead of glue along the cardboard and then pressed the fabric into the hot glue and made sure it was really stuck.  I did this in 3 inch sections so that the glue didn't cool before I got the fabric attached.  I did one long side, followed by the opposite long side, being sure to pull the fabric tight.  Then I turned the cardboard around and folded the short end like you would at the end of a gift box and then pulled this almost triangular end up and glued it in place.  Maybe the picture will help you to see how very much the back looks like a Christmas present.


To the left is the long side and along the bottom is the folded end.

To make this a little trickier, I found that the fabric remnant I had wasn't wide enough to cover the box.  It was plenty long enough, so I cut it in half which left me with two pieces that could wrap around the cardboard the long way, but would only meet about half-way across the front of the box.  To fix this problem I had to lay the two pieces with the printed sides facing each other.  I folded one piece back and then ran some hot glue along the edge of the fabric and pressed the two pieces together.  Once it was cooled, I could fold the top piece back and I had one large square of fabric with a "seam" in the middle.  If you really wanted to be fancy, you could make a patch-work quilt look to your bulletin board by using a variety of fabrics and gluing them in the same way.

To hide the "seam" and make the bulletin board cutsy, I used a ribbon to run long ways along that line.  I cut the ribbon long enough to wrap about 2 inches around the back and glued them into place.  I chose one ribbon to wrap long ways and then I wrapped another ribbon perpendicular to the first, but I edged it  to one side a bit so I didn't have to worry about making sure it was exactly in the middle.  It was a little more pleasing to the eye, too!  You can see from the following picture that it even looks like a present from the front now! :)  The ribbons will also come in hand for hanging notes and cards as they can just slide under the ribbon without the need for tacks.  This idea is taken from the french bulletin boards that I have seen at craft stores and home decorating stores.  I didn't have enough ribbon to crisscross multiple times (remember ... these are all supplies that I had on hand), but maybe next time!

Notice the position of the ribbon ... now for the bling!

Down in my craft bin I found some loose silk flowers that my mom-in-law had given me for making cards.  The flowers have the little holes from being on the stem.  I also had decorative brads in my card making supply.  I layered two flowers together and slid a brad in the middle ... ta-dah!  Adorable three-dimensional flowers to girly-up my functional bulletin board.  

Next I had to affix them to the board.  To make this work, I had to get a little creative ... but once I got the hang of it, it became easier.  The brads weren't pointed enough to poke into the cardboard through the ribbon and fabric, so I had to make a small hole with a tack, put a little dab of hot glue over the minuscule hole and then press the brad through the flowers, through the ribbon and through the gluey fabric ... quickly!  I pressed it in place until the glue cooled and I was pleased to discover that the brads were glued to the cardboard underneath.  Yeah!

Here I am pressing the brad through all the supplies and making it secure.

I did five different flowers:  one at the intersection of the ribbons and then one on each of ribbons at varying spots.  When all the flowers were glued on, I turned the entire board over and glued a small section of ribbon in a loop in the back for hanging it on the wall.  


Ready for the fun, flowery finished product?


So fun!  And functional!!

Like I said, I also made three for the bigger kids.  They were thrilled and already have tagged mementos to their flowered, butterfly and football memory boards.

I hope this was inspiring (you can make this!!) and not too hard to understand (it's tough to put into words what my hands do and make it make sense!).  If you have any questions, let me know ... otherwise, have fun!


Monday, September 13, 2010

DIY: Conquering the Couch Cushions

This weekend, I completed a project that I have wanted to tackle for quite a while.  We have a couch in our family room that we inherited from a friend ... a couch that likes to eat you.  Do you remember that movie, "The Little Shop of Horrors"?  Feed me, Seymour!!  Well ... that was our couch, without the singing. :)  The cushions on the back of the couch were sloppy and slumped and no matter how I fluffed or stuffed them, they would swallow you.  But not anymore ... now it is a nice little couch that sits up nicely and is actually a whole lot more comfortable to sit on.  If you have an ornery couch or chair that isn't behaving itself well ... here's what I did to tame ours.

First let me give you an idea of what I was working with:

This is NOT staged ... this was the typical look of our couch.
For the most part, the couch is in great condition, but the back cushions had no form and were constantly slumped.  I had re-stuffed the cushions a few years ago, but it had made very little difference.  There was no real backbone to hold them up and they were no match for the force of gravity!

And so ... I loaded up one of the cushions and headed to my favorite fabric store, Hi-Fashion Fabrics.  I love fabric stores ... they are full of such wonderful potential.  Everywhere I look I see a project I would love to make:  pillows, curtains, bags, clothes!  I'm kinda like a kid in a candy store. :)  This particular fabric store has a funny sign on the door:  "Parents:  Please supervise your children.  Running in the store is dangerous and will not be tolerated."  In light of this "suggestion" I usually find time to go alone.  Did I mention I love fabric stores? :)

Another reason I love this store is because the people who work there are wonderful resources, have lots background and are very willing to jump in and help you with your projects.  The particular woman I spoke with actually said she loved when people came in with good challenges.

I explained the problem (the cushions pretty much spoke for themselves) and she gave me a few ideas.


  • Option 1 was using a 5 inch formed foam that would fill the cushion completely.  Perfect!  After a few calculations ... our total came to about $75 ... a cushion.  


gasp!  ... visions of Brett's stricken face and the words, "HOW much?!?" coming out of his mouth.  


  • Option 2 was using two 2-inch pieces of foam and sandwiching some batting in between.  A few clicks on her calculator ... $33 for each ... totally $66 per cushion.  Not much better. 


slumped sigh ... visions of us forever being eaten by our couch.  

All my supplies.
The look on my face must have told her that this wasn't going to work either.  She tapped her pencil on her lips ... hmmmmm... "What if you used this?"  She pulled out a huge roll of thick woven batting.  "This is only $8.99 a yard ... which comes to ... $43.54 for both."  Yeah!!  After a few minutes of discussing some particulars of how to put it to use I was out the door and ready to transform our couch.

Making my pattern.
First, I rolled out paper to make my pattern.  (I bought this great newsprint paper at Sam's Club several years ago and it has come in handy for banners, outlines of the kids bodies for silly projects ... and now, couch recovery!)  I pulled the pillow insert out of the cushion case and laid the case on the paper.  It took a few minutes to fold all the extra fabric back to find the seams, but soon I had a good outline of the form of the cushion.

The batting after tracing.
Next I cut out the paper pattern (I only needed one as each foam piece was going to be the same shape.)  I then laid out the batting on the table and traced the pattern onto the batting with a thick black marker.  I repeated the tracing four times, end to end.

After I had all four pieces traced out, I started cutting out the shapes.  This was by far the hardest part of the job.  The batting was 2 inches thick and really quite challenging to cut.  But ... 20 minutes and one broken pair of scissors later - I was done! Whew!  Fortunately my hand still works today. :)

Before ...
Now was the moment of truth!  The cushions had an inner pillow that held all the fluffy batting inside. Initially I thought that I could keep the pillows the same size, but quite quickly it became clear that there wasn't enough room for all that fluff to fit in the cover.  I had to make a cut on one side of the pillow and remove almost half the old batting.  I took this time to re-fluff the remaining batting and even out the filling.  Then I sandwiched the pillow in between two of the cushion forms.  Then it was time to stuff!  This was actually a two-person job and it probably would have been fun to have a camera rolling as Brett and I wrestled the sandwich into the case.  You've heard the phrase, "Pig in a polk"?  That was us! The trick was to not change the evenness of the pillow sandwich while still using enough force to get it in the case.  With a little huffing, puffing and stuffing we were successful!

After! :)
This gives you an idea of the change ... I was so excited!  Right before my eyes, our couch went from slouchy to standing tall!  Within a few minutes we had the other cushion stuffed and our couch was transformed.  Brett and I sat down and were thrilled that there was more hiney room and the cushions extended up our backs instead of slumping down behind us.

Now our couch looks like a place where you'd like to cuddle up to watch a game or movie ... without any fear of being eaten! :)
Our Couch Recovered :)